Getting Started
How to access the Survey Builder Platform
The ConcentrixCX login page allows users to securely access the DIY Survey Builder platform using their assigned credentials. It requires a valid Sign-in Name and Password to authenticate.
To sign in to ConcentrixCX, navigate to the login page using the URL provided by your administrator, then enter your assigned username or email address in the Sign in name field and your secure password in the Password field. Click the Sign in button to access your account.

If you forget your password, you can reset it by clicking the "Forgot your password?" link and following the instructions. For any other login issues that cannot be resolved through password reset, select "Contact Us" to reach support.
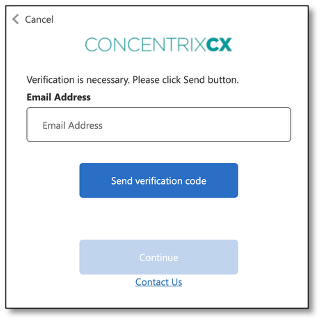
To verify your identity in ConcentrixCX, enter your registered email address in the Email Address field and click Send verification code. A code will be sent to your inbox, which you will need to enter on the next screen to continue. Once the code is entered, click Continue to complete the verification process.
Navigating the Survey Builder Platform
DIY Survey Builder Main Components
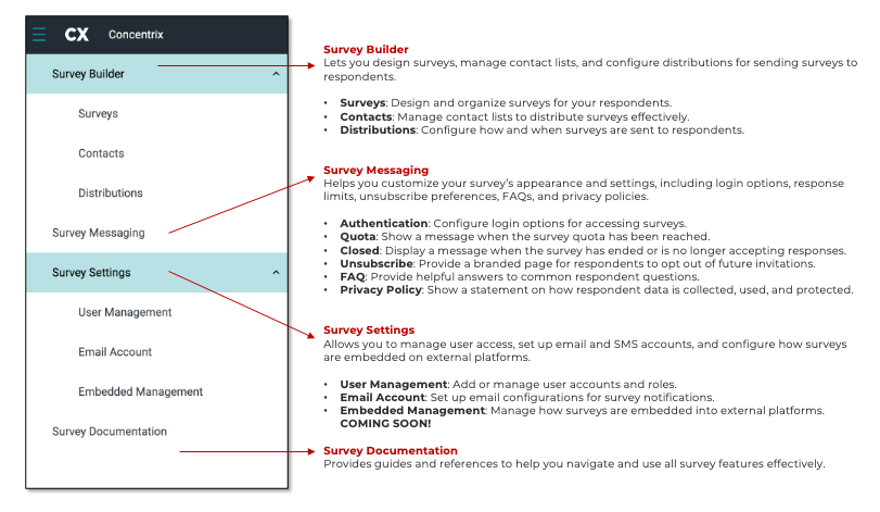
The DIY Survey Builder Main Components provide essential tools to design, configure, and manage surveys. From building surveys and managing settings to customizing branding and accessing helpful documentation, these components give you full control over your survey workflows.
DIY Survey Builder Main Page
The DIY Survey Builder Main Page offers an easy-to-use workspace to design, customize, and manage surveys with tools, modules, and quick-access settings all in one place.
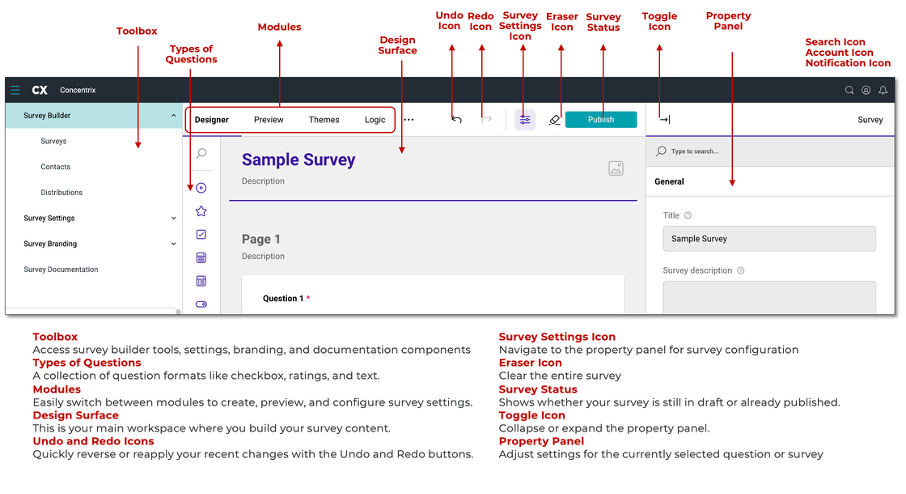
Once in the survey, use these items to reference tasks throughout the guide. Each survey contains a toolbox, a design surface, and a property panel. These are all tools that will help you customize your survey.
- Toolbox: show full mode or compact by expanding the panel.
- Design Surface: show the outline for the survey.
- Property Panel: Provides the customizations of the survey.
DIY Survey Builder Panels
When creating a survey, you can customize unique details for each survey, page, and question according to your needs. To access and edit the property you wish to customize, first select the survey, page, or question you want to edit. Then, click the toggle icon in the top right of your screen to expand the property panel. This panel will adjust based on your current selection.
By keeping the property panel open, you can quickly customize the details for each property. In the top right of your property panel, you will see the name of the property you are editing.
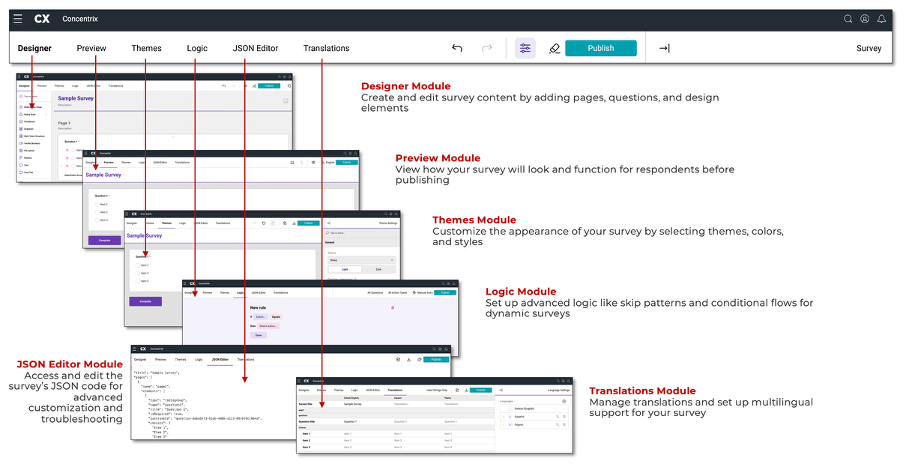
DIY Survey Builder Modules
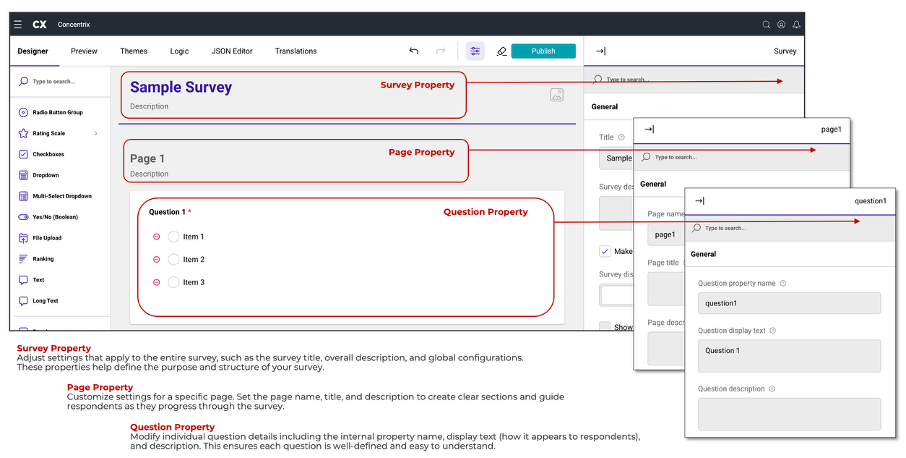
The DIY Survey Builder Modules provide all the tools you need to design, customize, and manage your surveys. From creating content and applying themes to adding logic, editing JSON code, and enabling translations, these modules let you build and fine-tune surveys with ease.
How to Search from the Survey List
To find other surveys, navigate to the menu bar at the top left of your screen. Click the three horizontal lines also known as the menu icon, to reveal the menu options. To look through previous surveys built, select the 'Surveys' option.
Once you select Surveys option, you will be presented with a list of surveys in varying statuses.
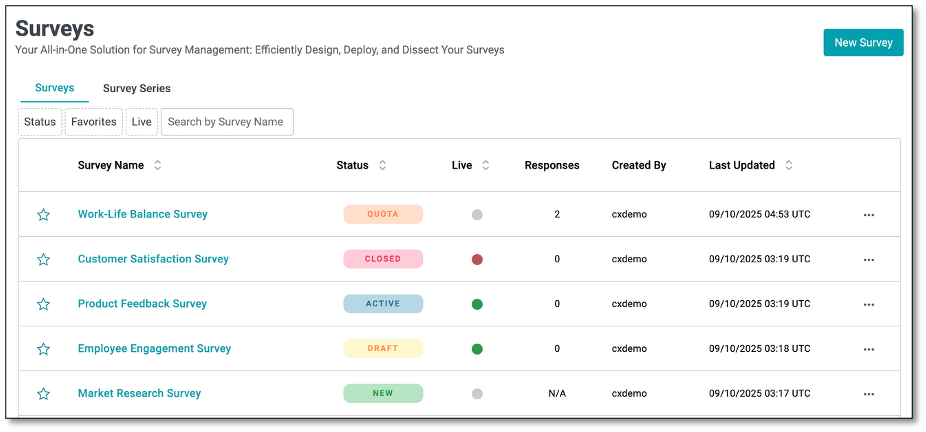
You can search by survey name, status, favorites and live or active surveys. To search by Survey Name, use the search bar at the top of the page and type in the survey title you wish to edit.
To filter surveys by Status, select the status icon to determine which status you wish to search. By selecting each of these filter items you will narrow down the survey type dependent on their survey status.
The Live column shows whether a survey is currently accessible to respondents, with a green dot indicating that it is active, while other colors or icons reflect inactive or unavailable status. The 'Responses' column indicates the number of people who have participated in your survey. The Created By column identifies the username or account that created the survey. The Last Updated column records the most recent date and time the survey was edited.
The ellipsis menu (…) on the far right provides quick actions for managing surveys.
- Edit – Open the survey in edit mode to update questions or settings.
- Rename – Change the survey's name.
- Close – End the survey and stop collecting responses.
- Duplicate – Create a copy of the survey for reuse.
- Dashboard – View survey results and analytics.
- Share – Generate options to distribute the survey thru a link.
- Delete – Permanently remove the survey.
The status represents the current state of the survey. There are different status categories that indicate information as to where the survey is at. Below are the different statuses that the surveys can be categorized by:
- New: A recently created survey that has not been published.
- Draft: A survey that is currently being edited but there is an active survey that is available for the recipients.
- Active: A survey that has been published and is currently open for recipient participation.
- Closed: A survey that has ended and is no longer accepting responses.
- Quota: The survey has reached its maximum allowed number of responses and cannot accept more.